Was this content helpful?
How could we make this article more helpful?
RAID
The information below provides a basic guide to the RAID modes available to LaCie 6big/12big Thunderbolt 3. Performance and protection differ based upon RAID level and the number of hard drives in a RAID array. For instructions how to configure a RAID array, see the LaCie RAID Manager user manual.
The level of RAID is contingent upon the amount of disks. For example, an array with four disks supports all standard RAID levels except RAID 1, which is not compatible with arrays greater than two disks. When making comparisons in an array with four disks, RAID 0 appears to be the optimal choice since it offers 100% storage capacity and the best performance. However, RAID 0’s major weakness is a lack of data protection in case of hard drive failure. Further, its performance is not much greater than RAID 5, which includes data protection in case one hard drive should fail. RAID 6 and, in unique cases, nested RAID levels, can provide data protection in the event that two or more hard drives fail.
Review the summaries for each RAID level before selecting your configuration for the LaCie 6big/LaCie 12big storage.
| RAID mode | Type | Minimum hard drives |
| RAID 0 | Standard | 2 |
| RAID 1 | Standard | 2 |
| RAID 5 | Standard | 3 |
| RAID 6 | Standard | 4 |
| RAID 10 | Nested | 4 |
| RAID 50 | Nested | 6 |
| RAID 60 | Nested | 8 |
Standard RAID levels
RAID 0
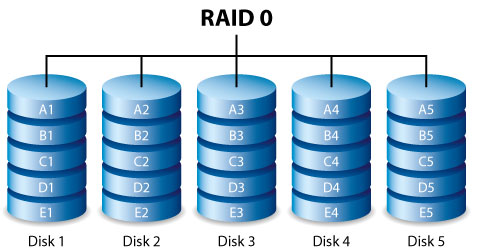
RAID 0 is the fastest RAID mode since it writes data across all of the array’s hard drives. Further, the capacities of each disk are added together for optimal data storage. However, RAID 0 lacks a very important feature: data protection. If one hard drive fails, all data is lost. A recommended option is RAID 5, which offers:
- Performance that can approach RAID 0.
- Approximately 75% of the storage capacity of all the hard drives in the RAID configuration.
- Data protection in case a single hard drive fails.
RAID 1
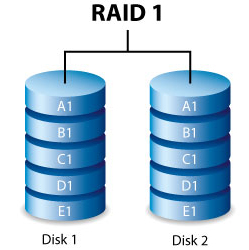
RAID 1 provides enhanced data security since all data is written to each disk in the array. If a single disk fails, data remains available on the other disk in the array. However, due to the time it takes to write data multiple times, performance is reduced. Additionally, RAID 1 reduces disk capacity by 50% since each bit of data is stored on both disks in the array.
RAID 5
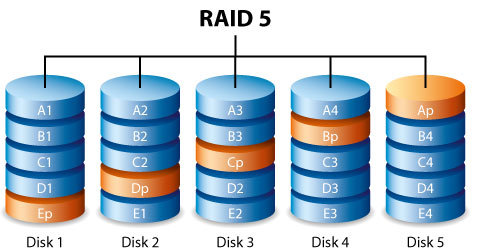
RAID 5 writes data across all hard drives in the array and a parity block for each data block. If one physical hard drive fails, the data from the failed hard drive can be rebuilt onto a replacement hard drive. While the files stored on a RAID 5 array remain intact should one hard drive fail, data can be lost if a second hard drive fails before the RAID is rebuilt with the replacement hard drive.
A minimum of three hard drives is required to create a RAID 5 array.
RAID 5 offers performance that can approach RAID 0. RAID 5’s strong advantage over RAID 0 is data protection. Additionally, you still have approximately 75% of the storage capacity of a RAID 0 array (based upon total available hard drives and storage capacities). The equation for determining the storage is:
The size of the hard drive with the smallest capacity in the array) * (Total hard drives-1)
Example 1: An array is assigned five 3TB hard drives for a total of 15TB. The equation is:
3TB * 4= 12TB.
Example 2: An array is assigned Three 2TB hard drives and one 3TB hard drive for a total of 9TB. The equation is:
2TB * 3= 6TB.
RAID 6
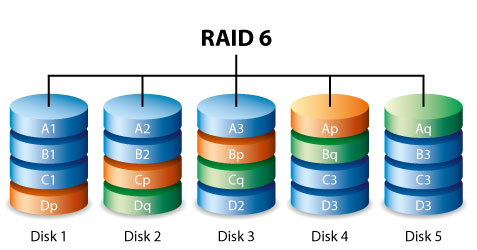
RAID 6 writes data across all disks in the array and two parity blocks for each data block. If one physical disk fails, the data can be rebuilt onto a replacement disk. With two parity blocks per data block, RAID 6 supports up to two disk failures with no data loss. RAID 6 synchronizing from a failed disk is slower than RAID 5 due to the use of double parity. However, it is far less critical due to its double-disk security.
A minimum of four disks is required to create a RAID 6 array. RAID 6 offers very good data protection with a slight loss of performance compared to RAID 5.
Nested RAID levels
RAID 10
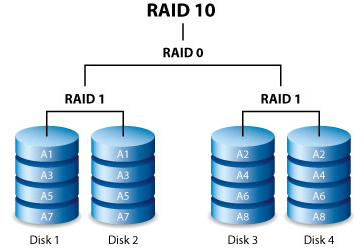
RAID 10 combines the protection of RAID 1 with the performance of RAID 0. Using four disks as an example, RAID 10 creates two RAID 1 segments, and then combines them into a RAID 0 stripe. Such configurations offer exceptional data protection, allowing for two disks to fail across two RAID 1 segments. Additionally, RAID 10 writes data at the file level and, due to the RAID 0 stripe, gives users higher performance when managing greater amounts of smaller files. This means a more generous input output per second for data, referred to as IOPS.
RAID 10 is a great choice for database managers that need to read and write a multitude of smaller files across the array's disks. The impressive IOPS and data protection offered by RAID 10 gives database managers impressive reliability both in keeping files safe and rapid access.
RAID 50

RAID 50 combines RAID 0 striping with RAID 5 parity. Due to the speed of RAID 0 striping, RAID 50 improves upon RAID 5 performance, especially during writes. It also offers more protection than a single RAID level. Use RAID 50 when you need improved fault tolerance, high capacity and impressive write speeds.
A minimum of six hard drives is required for a RAID 50 array. A RAID 50 array with a high number of hard drives increases the time to initialize and rebuild data due to the large storage capacity.
RAID 60
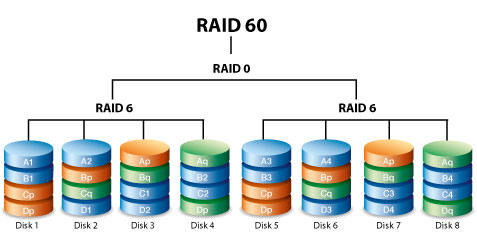
RAID 60 combines RAID 0 striping with RAID 6 double parity. Due to the speed of RAID 0 striping, RAID 60 improves upon RAID 6 performance. It also offers more protection than a single RAID level. Use RAID 60 when you need improved fault tolerance, high capacity and impressive write speeds.
A minimum of eight hard drives is required for a RAID 60 array. Since a RAID 60 array has a high number of hard drives, the time to initialize and rebuild data is longer than a single RAID level.
RAID+Spare
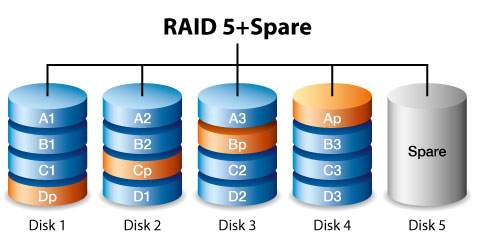
A RAID+Spare array gives you a “hot-spare” that is ready to synchronize data immediately should a hard drive fail. If a hard drive in the array fails, the data starts to synchronize with the spare. The advantage for a RAID array with a spare is the immediacy of the replacement hard drive. However, the spare cannot be used as storage during standard operation since its sole task is to take over should a hard drive fail.
You can replace the failed hard drive immediately and, once synchronization is complete, assign it as a new spare.
Drive failures and synchronizing a spare hard drive
For RAID+Spare arrays, data remains intact when the minimum number of redundant hard drives fail. However, if an additional hard drive fails before or during data synchronization with a spare hard drive, the data in the array is lost. See the examples below.
- RAIDs 1 and 5: one drive has failed and the array immediately begins to synchronize with the spare hard drive. If a second hard drive in the RAID 5 array fails before synchronization is complete, all data in the array is lost.
- RAID 6: two hard drives have failed and the array immediately begins to synchronize the first failed hard drive with the spare. If a third hard drive in the RAID 5 array fails before synchronization is complete, all data in the array is lost.
- Nested RAID: nested RAID levels have greater fault tolerances depending upon which of the nested RAID arrays have hard drives that fail.
- RAIDs 10 and 50: each of the nested arrays can can lose one hard drive. If one of the two nested arrays loses two hard drives before or during the synchronization, data is lost.
- RAID 60: each of the nested arrays can can lose two hard drives. If one of the two nested arrays loses three hard drives before or during the synchronization, data is lost.