Was this content helpful?
How could we make this article more helpful?
Hard Drive Maintenance
Precautions
- “Hot-swapping” means that you can remove and replace hard drives while the enclosure is powered on. LaCie 6big Thunderbolt 3 and LaCie 12big Thunderbolt 3 feature hot-swappable hard drives.
- During operation, the hard drives should remain in their slots for optimal air flow. Airflow and fan performance are regulated by temperature.
- Observe all conventional ESD precautions when handling hard drives.
Replacing a hard drive
Replace a hard drive if:
- You want to expand the available storage space by adding a hard drive with a larger capacity.
- The hard drive has failed.
If a failed hard drive is under warranty, make certain to contact LaCie support to receive a replacement disk.
When adding new hard drives or replacing hard drives that are not under warranty, consider using Seagate Enterprise HDD that are optimized for use with your LaCie 6big Thunderbolt 3 and LaCie 12big Thunderbolt 3. For further information about compatible hard drives, visit LaCie support.
Since LaCie 6big/LaCie 12big supports hot swapping hard drives, it is not necessary to power down the device to replace a single hard drive.
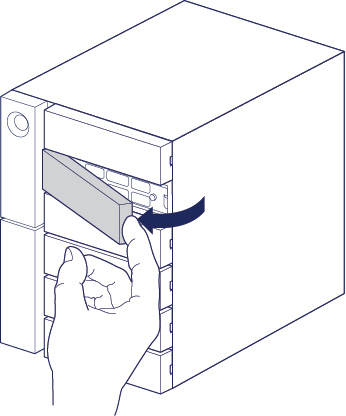
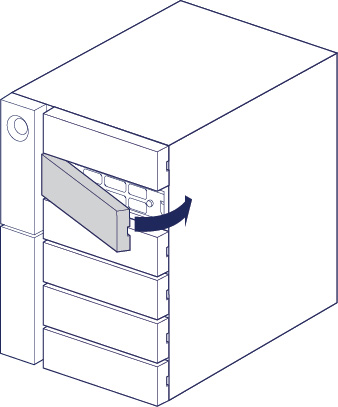
- Locate the hard drive you want to replace and place your index finger on the small hole on the right side of its disk tray.
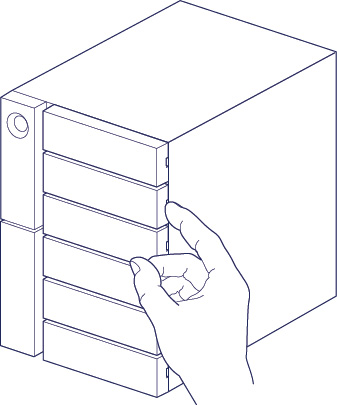
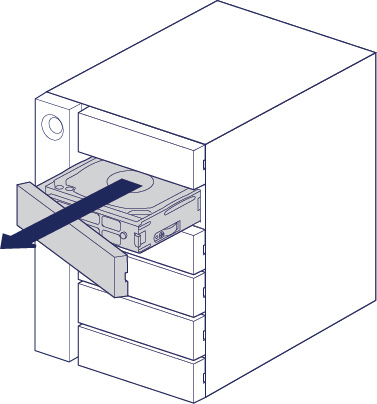
- Gently pull your index finger away from the enclosure and maintain a firm grip as it unlocks the hard drive from the SATA connector. Once it is loose, hold the hard drive with both hands as you remove it from the slot.
- If you are replacing a failed hard drive with a full disk tray, skip to Step 4. Continue here if you are replacing the hard drive using the same disk tray.
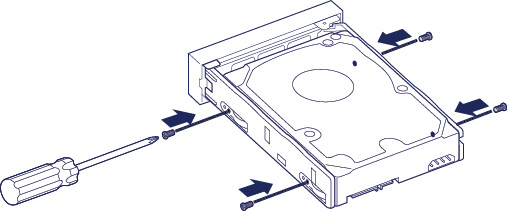
- Using a Phillips head screwdriver, carefully unfasten all four screws from their four slots.
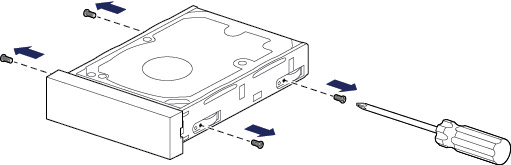
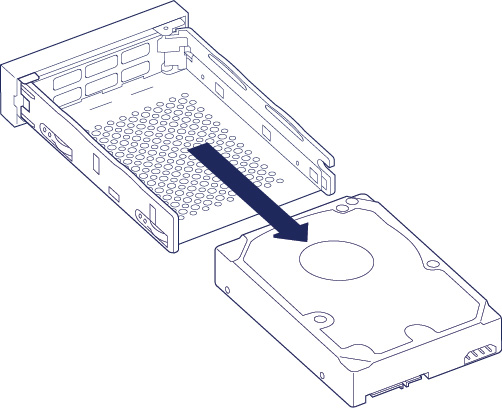
- Gently slide the disk out of the tray.
- Place the empty disk tray onto a flat work area with the handle on the bottom left.
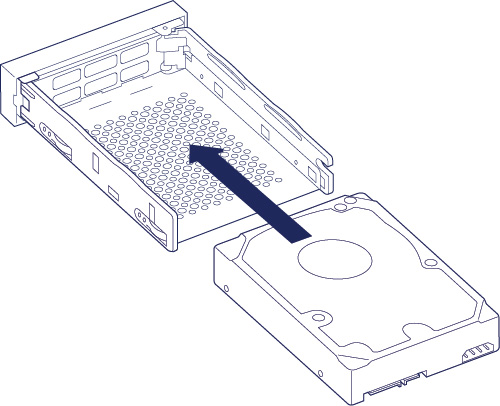
- Many disks have a label on one side and the printed circuit board on the opposite side. With its label side facing up, gently place the hard disk within the disk tray. Keep the SATA connector facing to the right. The four screw slots should align with the disk’s four screw holes.
- Using a Phillips head screwdriver, carefully fasten all four screws into their four slots. Do not force the screws into the slots. Forcing the screws too tight into the slots can make it difficult to remove them later and strip the screws' teeth.
- Using a Phillips head screwdriver, carefully unfasten all four screws from their four slots.
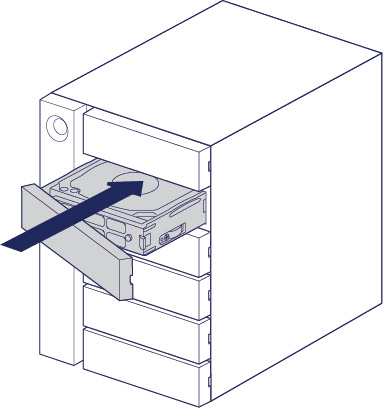
- Carefully insert the full disk tray into the empty disk slot. Gently push the disk tray handle until you feel it snap into place.
See the LaCie RAID Manager user manual for instructions how to manage the LaCie 6big/LaCie 12big storage.
When replacing hard drives that are members of an active RAID array, the hard drive LEDs blink red and blue indicating that the RAID is synchronizing data. You can continue to use the LaCie 6big/LaCie 12big storage but performance is reduced until the synchronization is complete.
LaCie 6big/LaCie 12big enclosure: non-serviceable components
The components inside the chassis are NOT hot-swappable and are NOT serviceable at any location outside of LaCie-approved service centers. Removing the cover voids your product’s warranty. Additionally, removing, replacing or changing any part in the enclosure or, performing any action that involves the components in the enclosure, voids the product’s warranty. If you are experiencing hardware errors or failure, contact LaCie support for assistance.